AUTOMATION & RECORDING
Event Editor 
The Event Editor holds automation data that moves linked controls according to the curves recorded, set or drawn. Event automation is closely related to Automation Clips but differs in two main ways. 1. Event Automation is bound to a specific Pattern, Pattern Clip. Automation Clips are not, they are a type of generator' plugin. 2. Event data can be recorded from live controller movements or drawn into the Event Editor by hand. Automation Clips can be edited only, you can't record one. Although you can convert Event Data to Automation Clips.
NOTE: You can convert recorded Event automation data to Automation Clips with the Menu > Edit > Turn into automation clip option.
Controls
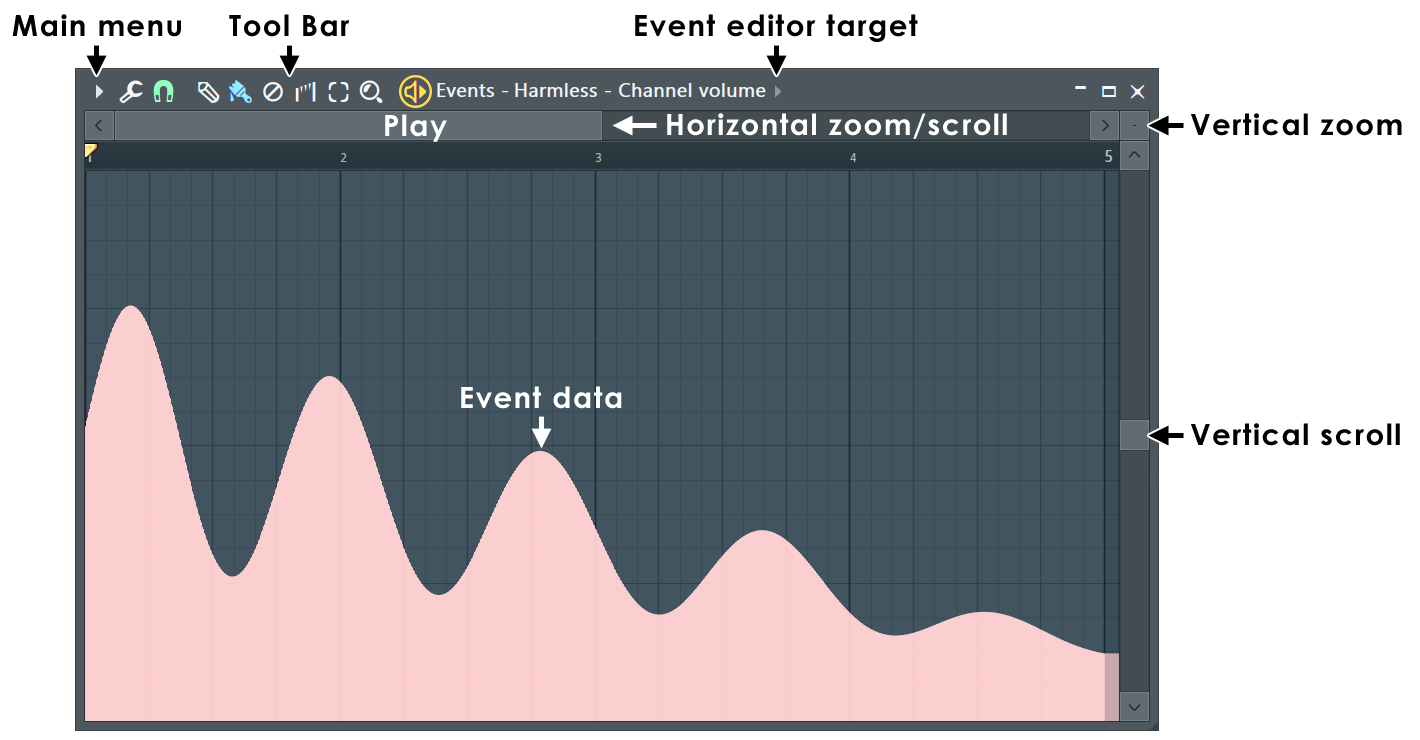
- Toolbar icons - Along the top of the Piano roll window:

Main Menu - Includes: File, Edit, Tools, View, Snap, Zoom, Target and Smoothing options. 
Tools Menu - Includes: Scale Levels and LFO tools. 
Snap - Controls the time resolution (horizontal). E.g. a setting of '(none)' will allow the finest resolution while 'Beat' will only allow value changes on every beat. NOTE: Snap only applies to the Draw tool (pencil icon) mode. 
Draw tool ( P) - Left-click and drag to draw freehand. Right-Click and drag to draw straight lines. Modifier keys: ( Shift) - Lock vertical position. ( Ctrl) - Select time-line. ( Alt) - Bypass snap. 
Paint tool (brush) (B) - Bypasses the snap value. Right-Click and drag to draw straight lines OR to edit in interpolate mode. Modifier keys: ( Shift) - Lock vertical position. ( Ctrl) - Select time-line. 
Erase tool (D) - Resets data to the value at the start of the selected range. Modifier keys: (Ctrl) - Select time-line. 
Interpolate (I) - Redraw and connect data with straight lines. 
Select tool (Left Mouse) - Make a time-line selection. 
Zoom tool (Z) - Zoom the time-line. Right-Click to zoom out. - Event Editor Target - Select any Event Automation data in the currently selected Pattern.
Event Editor Facts
Event automation may link to controls on the FL Studio interface or in plugins (native and external). Some important Event Editor facts:
- Browse all automation in the project using the Browser > Current project > Patterns folder.
- The Event Editor will only show data from the selected pattern. Use the Toolbar Pattern Selector or Playlist Picker Panel to change patterns.
- Convert Event Automation to an Automation Clip by selecting 'Turn into Automation Clip' from the Event Editor Menu.
- The Event Editor is the location for all recorded automation. Remember, the pattern selected during recording holds the Automation data.
- Event Automation can be manually edited and drawn.
- A single pattern may contain multiple Automation Events, use the Target menu to swap between Event Automation data for the selected pattern. Patterns may contain an unlimited number of Event Automation data-sets.
- Event Automation data can be visualized and/or edited from a number of locations:
- From the Event Editor:
- 1. Select the Pattern that will hold the Event Automation, Right-Click the control to be automated, then select 'Edit events'. If automation data was recorded for the control, the data will be displayed and it can be edited. If there is no pre-existing Event Automation data then it can be manually drawn and saved (simply close the editor when you are done).
- 2. Use the Browser > Current project > Patterns > 'Pattern name' folder. Left-click on an Event Automation file to open the Event Editor. NOTE: This will only be possible if Event Automation data exists somewhere in your project.
- From the Piano roll - Event Automation data can be displayed and edited in the lower panel of the Piano roll. Select a Pattern containing the automation data, then select the Event Automation data from the Target Control menu.
- From the Playlist - Event Automation data is shown as shading in the clip. If you would like Event Automation data to be independent of patterns, use the closely related Automation Clip. Event Automation data can be converted to an Automation Clip using the Edit > Turn into automation clip command in the Event Editor Main Menu.
- From the Event Editor:
NOTE: To link other controls to Event Automation data - First convert the Event Automation to an Automation Clip through the Event Editor Menu > Edit > Turn into Automation Clip. The Automation Clip will now appear as an 'Internal controller' link option in the 'Link to controller' Right-Click dialog on automatable controls and also in the Browser > Current project > Remote control list.
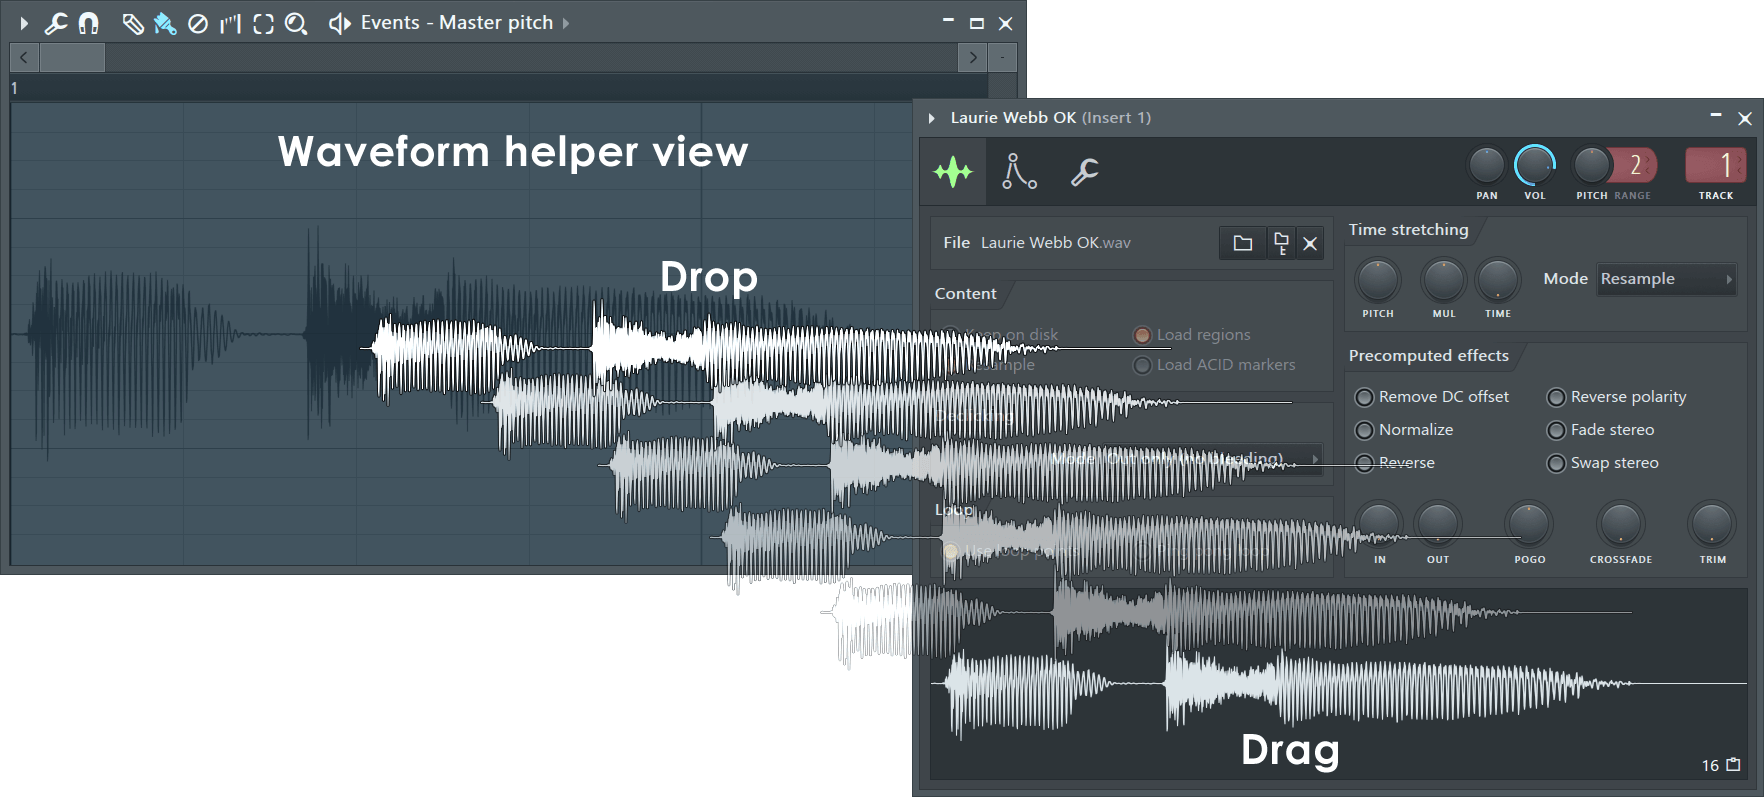
Waveform Helper View
Sometimes it is useful to closely align Event Automation data with an audio waveform. For example when using Fruity Vocoder or Pitcher. To show the waveform drag from a waveform preview and drop on the Event Editor. To switch the view on and off after this, use (Alt+N).
Working with Event Automation data
The Event Editor graph shows time on the horizontal axis (measured in bars) and automation values on the vertical axis (0 to 100%). The time segments of the Playlist are set by the window's 'snap' parameter (![]() ). Alternatively, selecting 'Main' will implement the global snap value as defined in the Snap Panel. Events are displayed as vertical lines (height represents the value of the event). The Event Editor window can display only one event data-set at a time.
). Alternatively, selecting 'Main' will implement the global snap value as defined in the Snap Panel. Events are displayed as vertical lines (height represents the value of the event). The Event Editor window can display only one event data-set at a time.
- Open an Event Editor - Two alternative methods are:
- 1. Select a Pattern and Right-Click the target control, then select 'Edit events'. If automation data was recorded for this target, the data will be displayed and can be edited. If there is no pre-existing Event Automation data then it can be manually drawn and saved.
- 2. Use the Browser > Current project > Patterns > 'Pattern name' folder. Left-click on an automation target to open the Event Editor.
To switch between displayed events in the currently opened Event Editor (or to open a new one if none are open). You can also select Edit Events in New Window, to open a new Event Editor window. Remember, the Event Automation data visible using the Event editor target menu will depend on the Event Automation data in the selected Pattern.
- Create an event - In the Event Editor, switch to Draw Mode () or Paint Mode
() and Left-click in the Event Graph Area. You can also create whole curves of events - just Left-click and drag to create the desired shape. To create straight lines of events instead, Right-Click in the grid and drag. Draw Mode and Paint Mode are identical, however Paint Mode ignores the
current snap settings, allowing you to draw smooth curves without changing your snap preferences.
- Interpolate between events - Use the Interpolate Mode (). While in this mode, Left-click and drag to select
the events to be interpolated. The events you select will be marked in blue. When you release the mouse button, all selected events will be refined
using linear interpolation. To use spline interpolation, drag using the right mouse button instead.
- Erase events - Use the Erase Mode ().
While in this mode, Left-click and drag to select events to be removed. Selected events will be marked in red and deleted when the button is released.
- Select events - In any mode (draw, erase, interpolate), double-click or (Ctrl+click) the time ruler and drag to select a time range. You can also use Select Mode
() to select with a single Left-click and drag. Selections are
used when cutting events and using the LFO tool (see the menu commands described below).
- Tools Menu () - This is a shortcut to the
window's tools submenu, containing various commands for operating on patterns in the Playlist.
Using the Event Editor with VST Plugins
There are two options:
- Tweak or move the target control on the plugin. Then use the Main menu option Tools > Last tweaked > Edit events.
- Use the Browser > Current project > Effect or Generators folder to see MIDI CC parameters for all controls the plugin publishes to the host (FL Studio). Then Right-Click the target and select Edit events.
Event Editor Menu
The Event Editor Main menu provides useful commands for editing events. You can access this menu by clicking the Event Editor menu icon.
- File
- Open Automation - Imports automation data from a score file (*.fsc) into the current Event Editor.
- Save Automation as - Saves automation data from the current Event Editor to a score file (*.fsc).
- Import MIDI (Ctrl+M) - Shows the Import MIDI Data dialog box where you can import controller data (cutoff, resonance, etc.) from a MIDI file to the Event Editor.
- Paste from MIDI clipboard (Shift+Ctrl+V) - Same as the Import MIDI command, but uses MIDI clipboard data rather than a MIDI file. You can paste data from several different sequencers that can copy to MIDI clipboard format (e.g. Cakewalk Pro Audio (TM)).
- Edit
- Cut (Ctrl+X) - Cuts all selected events to the clipboard. Select an area to cut, otherwise this command will be disabled.
- Copy (Ctrl+C) - Copies all selected events to the clipboard. Select an area to copy, otherwise this command will be disabled.
- Paste (Ctrl+V) - Pastes events from the clipboard to the current Event Editor. If an area is not selected, the events will be pasted in the beginning of the pattern.
- Delete (Del) - Deletes all selected events in the Event Editor. If no selection is made deletes all Event data.
- Select All (Ctrl+A) - Selects all events in the Event Editor.
- Select Previous (Ctrl+Left) - Moves the selection backwards so that the start of the selection matches the new selection end. For example, if you select a bar, this command selects the previous bar.
- Select Next (Ctrl+Right) - Moves the selection forward so that the end of the selection matches the new selection start. For example, if you select a bar, this command selects the next bar.
- Insert Space (Ctrl+Ins) - Creates "empty" space that matches the current selection by shifting the following events forward.
- Delete Space (Ctrl+Del) - Erases all events in the current selection and shifts back the following events to close the gap.
- Insert Current Controller Value (Ctrl+I) - Initializes the Event Editor with the current value of the corresponding automated control. If you have selected a time slice in the graph, the current value will be inserted at the beginning of the selection.
- Turn into Automation Clip - Converts the current event pattern into a new Automation Clip. The Sensitivity pop-up allows you to fine-tune the number of points used to best represent the Event data. NOTE It's a good idea to choose as few points as possible, since this will make editing the Automation Clip much easier later on.
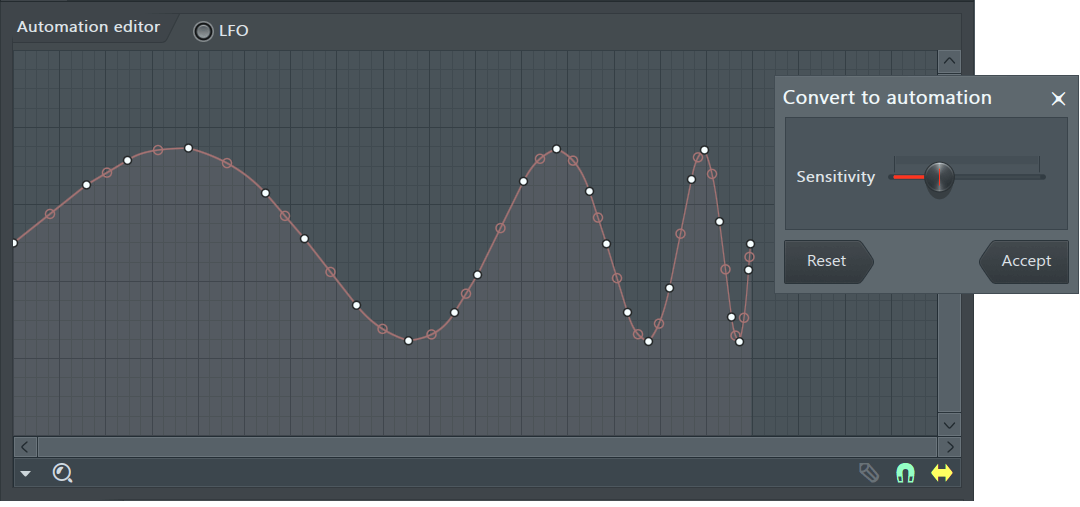
TIP: Due to the computational intensity of the conversion process, real-time updates as the slider is moved will change to 'compute on mouse up' when the conversion time exceeds 40 ms. Under these conditions hovering your Mouse Pointer over the control and rolling the (Mouse Wheel) will provide a better workflow.
- Tools
- Scale Levels - Multiplies/offsets/inverts the events in the event editor or maps the events to a logarithmic/exponential scale. See Scale Levels for more info.
- LFO (Ctrl+L) - Shows the LFO dialog, where you can draw LFO shapes in the Event Editor.
- View - View options include:
- Grid Color - Opens a standard Windows Color dialog box, where you can set a color for the Event Editor grid.
- Detached - When checked, the window is "detached" from the main environment of FL Studio and can be maximized on a second monitor (in a dual monitor setup).
- Invert grid - Changes the bar-grid lines from light to dark.
- Time segments - Change the vertical Playlist light/dark background shading according to the option selected. The default is '4 Bars'.
- Incremental scrolling - The scroll-position will scroll incrementally, rather than jumping to the precise location, when you click on the Scroll Bar rail.
- Precise time indicator - Uses a vertical line through the editor window to show playback and edit position.
- Helpers - Background waveform (Alt+N) - When a waveform has been dragged and dropped on the Editor, displays the waveform to aid note alignment with audio events.
- Snap - Snap determines how events move relative to the Event Editor grid and how quantization aligns items (NOTE: Holding the
Alt key temporarily sets snap to 'none'). The options are:
- Main - Snap is set to the Global snap value.
- Line - Events snap to the nearest grid-line, notice that the grid changes resolution as the Event Editor is Zoomed horizontally.
- Cell - Events snap to the start of the grid-cell they fall in.
- (none) - No snapping. Movement is limited only by the Project Timebase (PPQ) setting (F11). NOTE: Snapping can be temporarily disabled by holding the Alt key when dragging Events.
- Steps 1/6 to 1 (step) - Absolute grid values equal to the nominated fraction of a step.
- Beats 1/6 to 1 (beat) - Absolute beats values equal to the nominated fraction of a beat.
- Bar - 1 bar.
- Zoom - Right-Click to open a menu of quick zoom options:
- Zoom in/ Zoom out (Page up / Page down) - Zoom centers on the Cursor position.
- Quick-zoom 1, 2 & 3 (Shift+1, 2, 3) - Three handy zoom levels.
- Zoom out far (Shift+4) - Minimum horizontal zoom.
- On Selection (Shift+5 - Zoom to time-line selection. The command will be disabled if no time region is selected in the timeline.
- Target control - Each pattern can store a number of Event Data-sets, this menu item opens a list of the Event data-sets in the Pattern.
- Relocate Events - When deselected, paste commands will overwrite any existing events and Cut/Delete commands leave gaps. When selected, pasted commands will be insert and the Cut/Delete commands will shift forward all events after the selection.
- Auto Smoothing - When checked, the drawn events are automatically interpolated upon release of the mouse button.
- Center (0 (zero)) - Scrolls the timeline so that the playing position marker appears in the middle. This is a useful option if you want to see the playing position within a long sequence.