INSTRUMENTS / GENERATORS
Fruity Slicer
Fruity Slicer uses beat detection to slice a wave file into pieces and make them independently playable from the Piano roll or from a controller. If the wave file contains slice/region data this will be automatically used instead of beat-detection. Fruity Slicer offers playback, reordering of slices and time-stretching capabilities optimized for drum loops. A ![]() video tutorial is also available.
video tutorial is also available.
Left & Right-click the upper (Slice Properties) and lower (Slice Preview) windows to access more functions, as described below. For greater control over slices, Left-click and drag them from the 'slice properties' window to a Sampler Channel or other .wav compatible location. The Root Note (2) of the new slice will be set to the position it occupies in the slicer Piano roll, this allows you to re-use any Piano roll patterns (after deleting the other slice note information) you may have already constructed using the slicer.
A related but more advanced slicer is Slicex.
Function Buttons (


 )
)
- BPM / BEATS controls - Sets the tempo (speed) and number of beats (length) of the original loop. These settings are automatically set to the correct values if such information is embedded in the loop, otherwise Slicer will try to guess the loop tempo and length (the longer the loop, the less accurate the detection).
- Open and slice a sample button ()
- Load sample - Allows you to open a sample file (*.wav, Recycle *.rex / *.rcy / *.rx2, etc.) and slice it automatically. NOTE: If the sample already contains slice markers these will be used. .mp3 files can't contain slice markers, only .wav files.
- Save original sample - Saves the original sample, without slice information.
- Save processed sample - Saves the sample with slice information.
- Open beat slicer button () - Lets you select the method used to slice the loaded loop:
- Use Sample Built-In Slicing - Uses the slices loaded from the sample (if any). This is the best option as long as the loop is sliced properly.
- Dull / Medium / Sharp Auto-slicing - These are three options for auto-slicing the loop with three predefined values for the slice thresholds (see the threshold knobs explained below). The slicing performed is rough/normal/fine respectively.
- 1/6, 1/4, 1/3 beat ... Beat - The sample will be divided into even beat-quantized slices regardless of the content (i.e. no slice auto detection).
- No Slicing - The whole loop is treated as a single slice.
- Zero cross check slices - If you hear click/pop artifacts while playing the slices, you can call this option after slicing the loop with any of the options above. This will snap the slice markers to the nearest zero crossing.
- Edit
- Open in Edison - Sends the current slice to Edison (the integrated Editor).
- Open BeatSlicer - Sends the current slice and groove file (if applicable) to the registered beat slicer (e.g. BeatSlicer or BeatCreator) for further slice editing and refinement. After exporting the new groove file in your beat slicer you need to reload the groove into the generator ().
- Stretching method
All the stretching methods below can be fine-tuned with the pitch (PS) and time stretch (TS) sliders to the right of the 'Slice Properties' window.
- Fill gaps - This is the standard mode (A) from the original 'beatslicer' algorithm as used in the Fruity Slicer prior to FL7.
- Alternate fill gaps - This is the alternative 'beatslicer' algorithm (B) as used in the Fruity Slicer prior to FL7.
- Pro default - The 'Default' mode is designed to work with a wide range of input signals.
- Pro transient - In certain sounds the transients are crucial for the overall sound (percussion for example), this mode attempts to preserve the transients in the input signal.
- Transient - This is a lower CPU usage transient preserving stretch methods, and corresponds to the ?lastique mode C from the Fruity Slicer prior to FL7. mode.
- Tonal - Provides higher quality for input signals with a focus on tonal (pitched) parts and is equivalent to mode D from the Fruity Slicer prior to FL7.
- Monophonic - Is specialized for monophonic input signals (such as vocals or solo instruments) and should give the best results for these type of signals. The tonal quality is achieved through formant-preservation (see the section below for more on formants).
- Speech - This mode is optimized for speech (use 'Monophonic' mode for singing).
- View
- Spectrum - Changes the slice display to 'Frequency Spectrum' mode.
- Dump beat to piano roll button () - Allows you to 'dump' the beat to the Piano roll (using a time selection, if applicable), by writing a sequence of notes within it (each of which correspond to a single slice). Click to see a list of available 'dump' presets:
- Normal - Writes the notes to match the beat length (adjusted to current tempo).
- Reverse - As normal, however the sequence is reversed (each individual slice is still played forward).
- Random - Each slice is placed on random location while preserving the loop groove and length. The sequence will be different each time this option is selected.
- Flatten (groove) - The loop groove is preserved (slice locations) however all slice locations are played with the first slice.
- Shift Up / Shift Down - The groove is preserved but all slices are shifter up/down with one slice.
- Quantize / Swing - As normal, however the timing is adjusted (quantized and swing). Swing holds the first note of the bar at the expense of the second note in the bar.
- Accentuate Beat - The first slice in each beat (beat as a measurement) is assigned a higher velocity.
- Pitch Up Beat - Every slice which belongs to an odd beat (1st, 3rd, etc.) is assigned a higher pitch.
- Widen Stereo - The panning alternates between medium left panning and medium right panning for each alternate slice.
- Crazy - The pan, pitch and velocity values of every slice are randomized (values will be different each time).
- Stutter (half) / Stutter (quarter) - Each slice is broken into two pieces (half) or four pieces (quarter) to create a "stuttering" effect.
- Original Length - Dumps the slices to the Piano roll to match the loop's original speed (at the current tempo).
- Auto Dump switch - When enabled, Fruity Slicer will dump the sliced beat automatically after loading and when adjusting the loop's tempo/length.
- Auto-fit switch - If enabled the loaded loop will be adjusted to fit to the current project tempo on load.
- Pitch Shift slider (PS) - Changes the pitch of all slices (+/- 12 semitones), up or down (middle position = original pitch).
- Time Stretch slider (TS) - Time-stretches all slices (+/- 400%), while maintaining the selected pitch (middle position = original length). Use to fill gaps.
- DeClick - Applies very small fade in/out amounts to the slices (to remove click/pop artifacts).
- Attack slider (ATT) - Applies a fade in effect to the slices. Push the slider to the bottom to turn this effect off.
- Decay slider (DEC) - Applies a fade out effect to the slices. Push the slider to the bottom to turn this effect off.
- Animate - Shows a visual cue for the slice that is currently playing.
- Play to End - When enabled, each slice plays to the end of the loop.
Slicer Preview screen
Shows the sample and the generated/imported groove (where each slice is separated from the rest with vertical red lines). If you hold your mouse over a slice in this area, the hint panel in FL Studio will show the corresponding note that triggers it in the Piano roll and the Step Sequencer. Left-click a slice to select a new slice in the Properties View, Right-click to select and audition a slice.
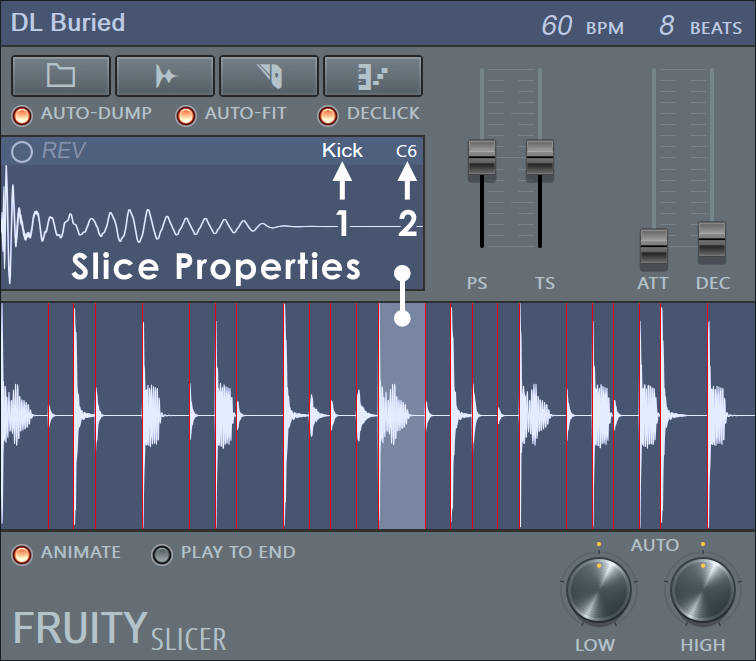
Slice Properties view
Above the Slicer Preview screen you can see the selected slice and some of its properties.
- Right-click to split, remove or copy slice.
- Left-click to audition and Left-click and drag to take slice out of Fruity Slicer and drop an a channel or other .wav compatible plugin. To change the slice displayed, Left-click on the slice of interest in the 'Slices Preview screen', located below the Slice Properties window.
- REV (Reverse) - Left-click to reverse the slice playback.
- Slice Name (1) - Left-click to rename or to select from a menu of pre-defined names. The name is displayed both in this plugin and in the Piano roll (when "names" mode is selected).
- Root Note (2) - Left-click to open a menu to re-define the root note, or to set 'Last hit key' that will assign each slice to the last hit MIDI key.
Slice Thresholds
The Auto Low and Auto High knobs (at the bottom of the interface) define the low and high thresholds used during auto-slicing (slice detection) of the loaded loop. Keep in mind that tweaking any of these options will cancel your previous setting (e.g. use built-in slices or slice per 1/2 beat, etc.) and switch to auto-slicing with thresholds based on these knobs.
Notes & Tips
- The tempo of any (correctly sliced) loaded loop will automatically be adjusted to the tempo of your song.
- As you can access any of the slices in the loop in the Piano roll you can easily rearrange the loop in any way.
- You can apply an effect (pitch, volume, etc.) to each slice in the loop in the Piano roll.
- Be picky about the slicing. If the slice markers aren't positioned perfectly
or if a slice marker is missing, don't hesitate to press open the loop in BeatSlicer
() and fine tune the slice markers in BeatSlicer/BeatCreator. We can assure
you
that it will be well worth the small effort.
Plugin Credits: Didier Dambrin (Slicer plugin), Peter Segerdahl (BeatSlicer engine)